How to Clean a Vaporizer: Step-by-Step Guide 2025
Learn how to clean a vaporizer step-by-step. Complete guide covering cleaning methods, tools needed, frequency, and maintenance tips for dry herb vaporizers.
Top Picks for Beginners
Storz & Bickel Crafty+ Vaporizer
Best for: Easy to clean design
Removable cooling unit makes cleaning simple. German engineering ensures durable, easy-to-maintain construction.
AirVape X Vaporizer
Best for: Simple maintenance
Straightforward design with accessible parts. Lifetime warranty covers maintenance concerns.
PAX MINI Vaporizer
Best for: Easy cleaning design
New 3D oven screen makes cleaning simple. Magnetic oven lid provides easy access for maintenance. Compact design means fewer parts to clean.
How to Clean a Vaporizer: Step-by-Step Guide 2025
Cleaning your vaporizer maintains performance and flavor. Regular cleaning prevents clogs and buildup. This guide covers everything you need to know about cleaning your vaporizer.
Why Cleaning Matters: Clean vaporizers produce better vapor quality. Regular maintenance extends device lifespan. Proper cleaning prevents airflow issues. You get better flavor from a clean device.
Why Clean Your Vaporizer
Cleaning your vaporizer improves performance. Resin buildup restricts airflow. Dirty devices produce weaker vapor. Regular cleaning maintains optimal performance.
Benefits of Regular Cleaning:
- Better vapor quality and flavor
- Improved airflow
- Extended device lifespan
- Prevents clogs and blockages
- Maintains consistent performance
What Happens Without Cleaning:
- Reduced vapor production
- Clogged airflow paths
- Diminished flavor quality
- Potential device malfunctions
- Shorter device lifespan
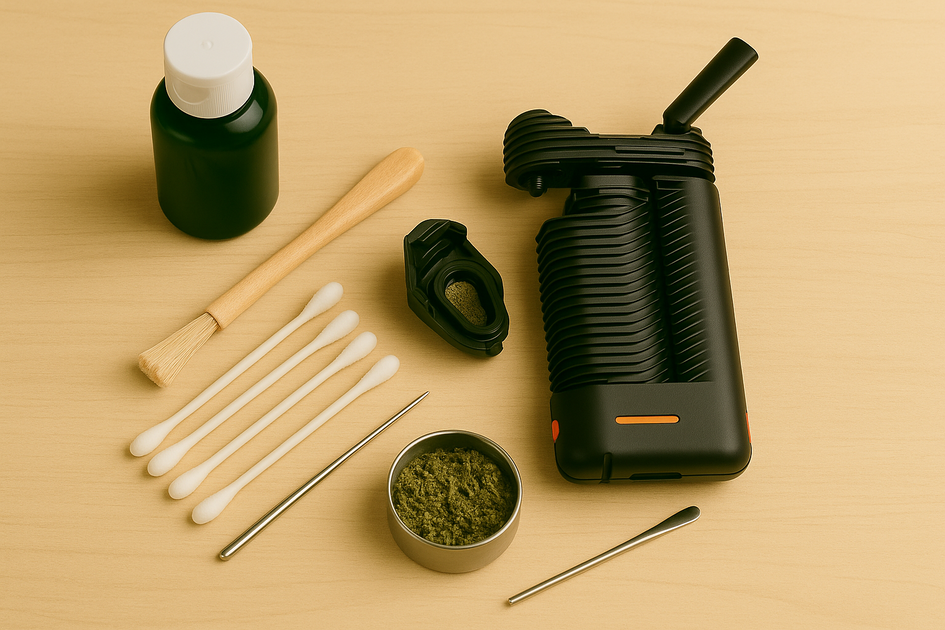
Cleaning Supplies You Need
Gather these supplies before cleaning. Most items are available at drugstores or online. Keep a cleaning kit ready for regular maintenance.
Essential Supplies:
- Isopropyl alcohol (91% or higher)
- Cotton swabs
- Pipe cleaners
- Small brush (toothbrush works)
- Paper towels
- Warm water
- Small container for soaking
Optional Supplies:
- Cleaning wipes
- Compressed air
- Replacement screens
- Cleaning solution (device-specific)
When to Clean Your Vaporizer
Clean your vaporizer based on usage frequency. Regular users need weekly deep cleaning. Occasional users can clean monthly. Clean immediately if you notice performance issues.
Cleaning Schedule:
- After each session: Empty and brush bowl
- Weekly: Deep clean cooling unit
- Monthly: Full device cleaning
- As needed: Clean when performance decreases
Signs You Need to Clean:
- Reduced vapor production
- Clogged airflow
- Diminished flavor
- Visible resin buildup
- Device not heating properly
Step-by-Step Cleaning Process
Step 1: Disassemble Your Device
Disassemble your vaporizer completely. Remove all removable parts. Check your device manual for disassembly instructions. Keep track of all parts.
Disassembly Tips:
- Work on a clean surface
- Take photos if needed for reassembly
- Keep small parts in a safe place
- Follow device-specific instructions
Step 2: Clean the Bowl
Clean the bowl after each session. Remove material while still warm. Use a brush to remove residue. Deep clean weekly with isopropyl alcohol.
Bowl Cleaning Steps:
- Empty material while warm
- Brush out loose residue
- Wipe with isopropyl alcohol
- Use cotton swabs for tight spaces
- Rinse with warm water
- Let air dry completely
Step 3: Clean the Cooling Unit
The cooling unit requires the most attention. Resin buildup occurs here frequently. Deep clean weekly for best results.
Cooling Unit Cleaning:
- Disassemble cooling unit completely
- Soak parts in isopropyl alcohol (30 minutes)
- Scrub with cotton swabs
- Use pipe cleaners for air paths
- Rinse with warm water
- Let air dry completely
Step 4: Clean Air Paths
Air paths can clog with resin. Use pipe cleaners to clear blockages. Compressed air helps remove debris. Check all air paths regularly.
Air Path Cleaning:
- Use pipe cleaners for narrow paths
- Blow compressed air through paths
- Check for blockages
- Ensure clear airflow
Step 5: Clean Exterior
Clean the exterior with a damp cloth. Avoid getting water in electronic components. Wipe down buttons and display. Keep device looking new.
Exterior Cleaning:
- Use damp cloth (not wet)
- Avoid electronic components
- Dry immediately
- Polish if desired
Step 6: Reassemble and Test
Reassemble your device carefully. Ensure all parts are dry. Test device before use. Verify proper function.
Reassembly Tips:
- Ensure all parts are completely dry
- Follow device manual instructions
- Check all connections
- Test device before use
Cleaning Different Vaporizer Types
Portable Vaporizers
Portable vaporizers require regular cleaning. Focus on the cooling unit and bowl. Clean weekly with regular use. Maintain battery contacts.
Portable Cleaning Focus:
- Cooling unit (weekly)
- Bowl (after each session)
- Air paths (weekly)
- Battery contacts (monthly)
Desktop Vaporizers
Desktop vaporizers need less frequent cleaning. Focus on the heating chamber and air paths. Clean monthly with regular use. Maintain connections.
Desktop Cleaning Focus:
- Heating chamber (monthly)
- Air paths (monthly)
- Connections (as needed)
- Exterior (weekly)
Deep Cleaning Process
Deep cleaning removes stubborn buildup. Perform monthly or as needed. Soak parts longer for tough residue. Use stronger cleaning solutions if necessary.
Deep Cleaning Steps:
- Disassemble completely
- Soak parts in isopropyl alcohol (1-2 hours)
- Scrub with brushes and swabs
- Use pipe cleaners for air paths
- Rinse thoroughly with warm water
- Let air dry completely (24 hours)
- Reassemble and test
Maintenance Tips
Regular Maintenance
Regular maintenance prevents major issues. Clean after each session. Perform weekly deep cleaning. Maintain device properly.
Maintenance Schedule:
- Daily: Empty bowl after use
- Weekly: Deep clean cooling unit
- Monthly: Full device cleaning
- As needed: Address performance issues
Storage Tips
Store your vaporizer properly when not in use. Keep it clean and dry. Store in a protective case. Charge before storing long-term.
Storage Guidelines:
- Clean before storing
- Store in cool, dry place
- Use protective case
- Charge before long-term storage
Troubleshooting Cleaning Issues
Stubborn Resin Buildup
Stubborn resin requires longer soaking. Increase isopropyl alcohol concentration. Use brushes and pipe cleaners. Be patient with tough buildup.
Solutions:
- Soak longer (2-4 hours)
- Use higher alcohol concentration
- Scrub with brushes
- Use pipe cleaners
Parts Won’t Come Apart
Parts may stick together with resin. Heat the device slightly. Use isopropyl alcohol to loosen. Be gentle to avoid damage.
Solutions:
- Heat device slightly
- Apply isopropyl alcohol
- Twist gently
- Avoid forcing parts
Cleaning Residue Remains
Residue may remain after cleaning. Soak longer in isopropyl alcohol. Use stronger cleaning solutions. Scrub more thoroughly.
Solutions:
- Soak longer
- Use stronger solutions
- Scrub more thoroughly
- Repeat cleaning process
Safety Tips
Cleaning Safety
Follow safety guidelines when cleaning. Use isopropyl alcohol in well-ventilated areas. Avoid open flames. Keep cleaning supplies away from children.
Safety Guidelines:
- Work in well-ventilated area
- Avoid open flames
- Keep supplies away from children
- Follow device manual instructions
Device Safety
Ensure device is completely dry before use. Do not use device with wet parts. Check all connections before use. Test device after cleaning.
Device Safety:
- Ensure complete dryness
- Check all connections
- Test device before use
- Follow manufacturer guidelines
Best Practices
Clean Regularly
Regular cleaning maintains performance. Clean after each session. Perform weekly deep cleaning. Maintain consistent schedule.
Use Proper Supplies
Use recommended cleaning supplies. Isopropyl alcohol works best. Avoid harsh chemicals. Follow device-specific guidelines.
Dry Completely
Ensure all parts are completely dry. Let air dry for 24 hours. Do not use heat to dry. Check all parts before reassembly.
Follow Device Manual
Follow your device manual instructions. Each device has specific requirements. Use device-specific cleaning methods. Contact manufacturer if needed.
Common Cleaning Mistakes
Using Wrong Cleaning Solutions
Avoid using soap or harsh chemicals. These leave residue and affect flavor. Use isopropyl alcohol only. Follow device recommendations.
Not Drying Completely
Wet parts can damage devices. Always dry completely before use. Let air dry for 24 hours. Check all parts before reassembly.
Forcing Parts Apart
Forcing parts can cause damage. Use isopropyl alcohol to loosen. Heat device slightly if needed. Be patient and gentle.
Skipping Regular Cleaning
Skipping cleaning causes buildup. Regular cleaning prevents issues. Clean weekly for best results. Maintain consistent schedule.
Final Thoughts
Cleaning your vaporizer maintains performance and flavor. Regular cleaning prevents clogs and buildup. Follow this guide for optimal results.
Key Takeaways:
- Clean weekly with regular use
- Use isopropyl alcohol for cleaning
- Ensure complete dryness before use
- Follow device-specific instructions
Regular cleaning extends device lifespan and maintains vapor quality. Proper maintenance ensures consistent performance.
For more vaporizer guides, check out our how to use a vaporizer guide and best portable vaporizers guide.
Frequently Asked Questions
How often should I clean my vaporizer?
What do I need to clean a vaporizer?
Can I use water to clean my vaporizer?
How do I clean a vaporizer cooling unit?
What happens if I don't clean my vaporizer?
Can I use soap to clean my vaporizer?
About Cannabis Guide Hub
Your trusted source for cannabis education, product reviews, and industry insights. We use advanced research tools to analyze thousands of products and studies, then our team of cannabis specialists curates and verifies everything before sharing with our readers.
Affiliate Disclosure
This post contains affiliate links. We may earn a commission if you make a purchase through our affiliate partners at no additional cost to you. This helps support our content creation.